Every n8n beginner builds the same first workflow: something that messages you. And everyone gets stuck at the same two spots — finding the chat ID, and wondering why the bot won’t message them. This is the 15-minute version with both traps pre-solved, tested on my own n8n 2.30.7 instance, with the finished workflow as an importable JSON at the bottom.
What we’re building: a bot that messages you tomorrow’s weather every morning at 8. The weather part is a stand-in — swap the HTTP node for anything (your server status, new orders, new software releases) and the Telegram half stays identical.
Step 1: Create the bot (BotFather, 3 minutes)
In Telegram, search for @BotFather — the one with the blue verification badge, since fakes rank right below it. Then:
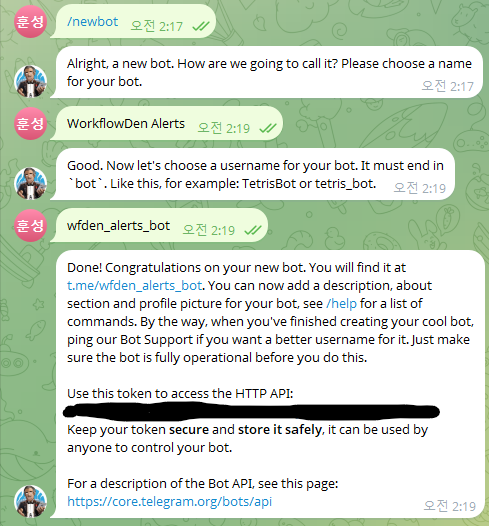
/start, then/newbot- Give it a display name (mine: WorkflowDen Alerts)
- Give it a username ending in
bot(mine: wfden_alerts_bot)
BotFather replies with an API token. Copy it somewhere safe and treat it like a password — anyone who has it controls your bot.
Step 2: The trap everyone hits — press Start
Open your new bot’s chat (t.me/your_bot_name) and press Start, then send it any message. Telegram bots can’t message a user who hasn’t messaged them first. Skip this and every later step fails silently with no useful error. If your bot “doesn’t send anything” at the end of this tutorial, it’s almost always this.
Step 3: Get your chat ID (2 minutes)
The Telegram node needs a chat ID, and there’s no button for it. In your browser, open:
https://api.telegram.org/bot<YOUR_TOKEN>/getUpdates(No space between bot and your token.) Because you messaged your bot in Step 2, the JSON response contains it: look for "chat":{"id": followed by a number. That number is your chat ID.
Empty "result":[]? You skipped Step 2 — message the bot and refresh.

Step 4: The workflow (three nodes)
- Schedule Trigger — Days, trigger at 8am. Set
GENERIC_TIMEZONEin your n8n config or “8am” means UTC (my Docker setup guide has this baked in). - HTTP Request — the free Open-Meteo forecast API, no key needed:
https://api.open-meteo.com/v1/forecast?latitude=37.57&longitude=126.98&daily=temperature_2m_max,temperature_2m_min,precipitation_probability_max&timezone=Asia%2FSeoul&forecast_days=1Swap the latitude/longitude for your city.
- Telegram → Send Message — create a credential with your BotFather token, paste your chat ID, and set the text (expression mode):
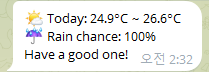
🌤 Today: {{ $json.daily.temperature_2m_min[0] }}°C ~ {{ $json.daily.temperature_2m_max[0] }}°C
☔ Rain chance: {{ $json.daily.precipitation_probability_max[0] }}%
Have a good one!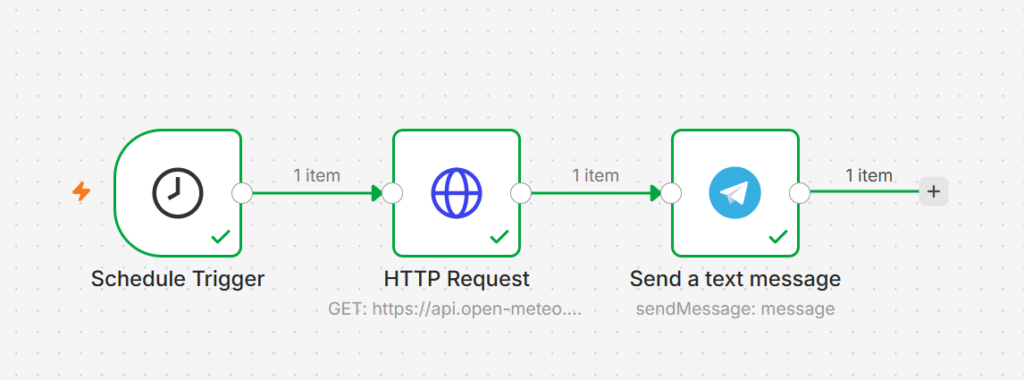
Two polish details from my build
Line breaks: the inline expression field eats newlines. Open the expression editor with the expand icon (or Shift+Enter) to write a multi-line message — my first send came out as one long line.
The “sent automatically with n8n” signature: n8n appends attribution to Telegram messages by default. Turn it off in the Telegram node under Additional Fields → Append n8n Attribution.
Publish it
Hit Publish — in current n8n versions, nothing runs on schedule until you do. My instance has been running workflows like this unattended with a zero percent failure rate, and the same Telegram half powers alerts for anything: a global error notifier (pattern 3 here), release alerts, or whatever your HTTP node fetches.
Download the template
Download telegram-daily-alert.json
Import via Workflow → Import from File, create your own Telegram credential with your token, and replace YOUR_CHAT_ID with the number from Step 3. Those are the only two things that don’t travel in an export.
This site isn’t affiliated with n8n GmbH, or any tool covered here. Built and tested on my own instance; screenshots unedited.